
Share this page


Creating an Eclipse Project in an Existing AccuRev Workspace
Describes how to create an Eclipse project in an existing AccuRev workspace.
-
Click the New button on the Eclipse toolbar.
The New Project dialog box opens.
-
In the Wizards window, navigate to AccuRev > Project from AccuRev. (If you have many wizards, simply type A in the Wizards window to jump directly to AccuRev in the list.)
-
Click Next.
Note: If you are not already logged in to AccuRev, you are prompted to do so. See Logging In to AccuRev.
The Checkout from AccuRev page opens.
-
Select a server where your AccuRev files are stored if the correct server is not already displayed in the Select a server field. If you need to add a server, see Adding an AccuRev Server.
- Expand the
Workspaces folder.
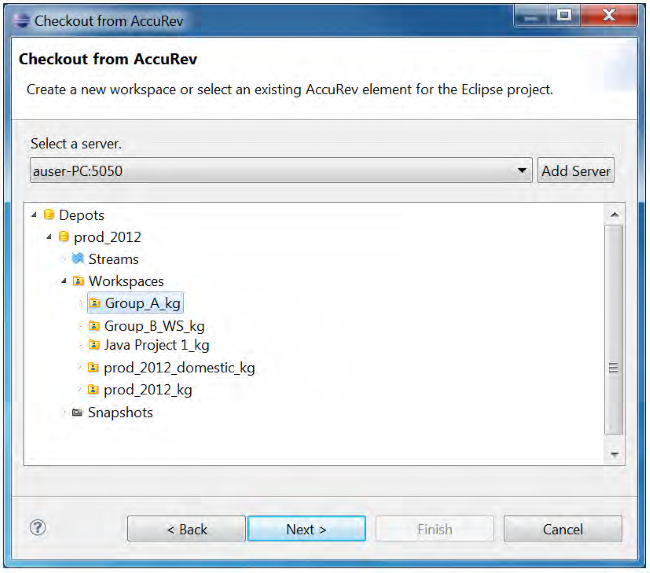
- Select the AccuRev workspace where you want the new Eclipse project to be placed.
-
Click Next. The Check Out As dialog box opens and displays two checkout options:
Check out as a project configured using the New Project Wizard This option allows you to create a new Eclipse project file using the New Project Wizard. Eclipse creates a new .project file. Check out in the workspace as projects This option allows you to use an existing .project file to create the new project. This option is selected by default if a .project file is detected in the workspace you selected in the previous step. Note: The .project file must have an AccuRev status of (kept) in order to be detected.
- Select the project checkout option you want to use.
-
Complete the Project Name field or leave it as displayed:
- If you selected the Check out as a project configured using the New Project Wizard option, the AccuRev workspace name is used as the default Project Name. You can change this name or leave the default.
- If you selected the Check out in the workspace as projects option, the Project Name is taken from the existing .project file. This name cannot be changed and the Project Name field is disabled. For more information, see How New Eclipse Project Names are Taken from Existing .project Files.
Note: The Project Location field displays the workspace path you selected.
-
Click Finish or Next as appropriate:
-
If you selected the Check out in the workspace as projects option, the Finish button is active. Click Finish. A Creating Eclipse Projects message displays and you are done. A new project is created.
-
If you selected the Check out as a project configured using the New Project Wizard option in Step 8, the Next button is active. Click Next. The New Eclipse Project Type Selection page opens.
-
Expand the project category you want to create, and then select a specific project type.
Note: The list of project types varies based on the Eclipse plug-ins you have installed.
-
Click Next.
The first page of the configuration wizard for the project type you selected appears.
Note: The wizard pages displayed from this point forward vary based on the project type you selected.
-
Complete the remaining wizard pages for the project type and click Finish. A new project is created.
-
-


